Don't forget to check out our online shop.
Septembers long awaited recipe
Scrumptious Ceiriad Chilli Beef (made with whole joint of brisket)
This recipe, whilst isn’t technically cooking in a camper, is just perfect for those autumnal days on the beach. Best made a couple of days before you want to eat it. As I type I can still see us sat over looking Porth Ceiriad with the guys munching on the chilli served wrapped in warm flour tortilla’s.
Ingredients
• Piece of brisket about 4lb in weight. We bought a fantastic joint off the meat man who comes to Penmaenmawr every Saturday - rain or shine!
• 2 tins of chopped tomatoes
• 6 fresh tomatoes quartered
• 2-3 fresh chilli’s – depending on your taste buds! I used 3 of our fresh chilli’s I grew over the summer in the greenhouse!
• 2 tins of red kidney beans
• 1 large onion chopped
• Tomato puree
• 1 garlic clove chopped
• Packet of Cajun seasoning or mix paprika, black pepper ,cayenne pepper and chilli.
• 1 table spoon of flour
• 1 beef stock cube
Method
• In a pan large enough to fit your joint in, lightly fry off the chopped onions, chilli – chopped and seeded , & the garlic.
• Add a good squirt of tomato puree and cook a further 2 mins.
• Roll the brisket in the flour and Cajun seasoning before adding to the onions and fry until the meat is lightly browned and sealed.
• Transfer the meat to a large casserole pot.
• In the pan which still has the onion mixture in it add the quartered fresh tomatoes along with the tins of tomatoes. Cook for approx 5 minutes and add the beef stock cube which has been added to ½ pint of water.
• Pour all the above over the beef and place in the oven – gas mark 5 – approx 180 , for about 3 hours. Keep checking that the mixture is not drying out, you can add either another tin of chopped tomatoes or more beef stock. I like to leave the meat in the oven until it literally falls apart.
• Once cooked, leave to cool. It is at this point I add the strained tins of kidney beans.
To reheat whilst at the beach or on an amazing trip!
As I said earlier , we love to make this before we go to the beach for the day. However we have also made it before we go on a weekend away. I freeze it, then place the frozen meal in the fridge we have in the van. It will then be defrosted enough for the 2nd night of our trip. It is essential to have some form of refrigeration if you are intending on storing this type of food. In the van we have a fridge which works off the leisure battery but will also go on mains / generator. Another bonus of a fridge is it will keep the beers chilled!!!!- I always said Grumpy had the right idea buying it!
Anyway, I digress!
To reheat, place the sauce along with the beef which you have torn into shreds with a knife and fork, into a pan and slowly reheat. Make sure you don’t burn the bottom! Place a lid or plate on top to keep it warm and remove from the heat. If you are lucky enough to have 2 burners you can keep it warm on as low a heat as you can possibly turn the burner down to. As I have mentioned previously it is harder to regulate the heat on a camp stove than on the home cooker.
Place a cold frying pan on your burner and add a flour tortilla. Add a good dollop of the chilli mixture to the centre of the now warm tortilla. Fold the sides in to form a wrap. Be careful not to add too much juice as you don’t want it all down your clothes!!!! You can also add a dash of sour cream or guacamole!
To eat!!
It is a shame I didn’t manage to get a photo of Ginger Craig at Porth Ceiriad on Sunday. He has perfected the art of eating this chilli wrap! Basically, whilst standing, you grab the wrap with both hands. Stick your bottom out as far as possible. Place hands at chin level with your elbows slightly bent and eat.
Eating using the Craig stance will ensure no nasty stains on your lovely clean Tee shirt – ideally a Grumpy Old Surfer Tee or hoody LOL
Enjoy with a chilled bottle of lager.
To fold the perfect wrap
Whilst the tortilla is in the frying pan place a good dollop of the mixture into the centre / top half of the tortilla.
Fold 1:-Fold the bottom half of the wrap up and over the filling making sure the flap overlaps at least ¼ of the filling .
Fold 2:-Fold one of the long sides over the flap and filling.

Fold 3 :- this extra fold is key to stopping the filling from falling out! . Simply tuck the bottom under the filling- see picture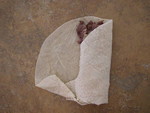
Fold 4:- Fold the other long side back over the wrap and enjoy!

This recipe, whilst isn’t technically cooking in a camper, is just perfect for those autumnal days on the beach. Best made a couple of days before you want to eat it. As I type I can still see us sat over looking Porth Ceiriad with the guys munching on the chilli served wrapped in warm flour tortilla’s.
Ingredients
• Piece of brisket about 4lb in weight. We bought a fantastic joint off the meat man who comes to Penmaenmawr every Saturday - rain or shine!
• 2 tins of chopped tomatoes
• 6 fresh tomatoes quartered
• 2-3 fresh chilli’s – depending on your taste buds! I used 3 of our fresh chilli’s I grew over the summer in the greenhouse!
• 2 tins of red kidney beans
• 1 large onion chopped
• Tomato puree
• 1 garlic clove chopped
• Packet of Cajun seasoning or mix paprika, black pepper ,cayenne pepper and chilli.
• 1 table spoon of flour
• 1 beef stock cube
Method
• In a pan large enough to fit your joint in, lightly fry off the chopped onions, chilli – chopped and seeded , & the garlic.
• Add a good squirt of tomato puree and cook a further 2 mins.
• Roll the brisket in the flour and Cajun seasoning before adding to the onions and fry until the meat is lightly browned and sealed.
• Transfer the meat to a large casserole pot.
• In the pan which still has the onion mixture in it add the quartered fresh tomatoes along with the tins of tomatoes. Cook for approx 5 minutes and add the beef stock cube which has been added to ½ pint of water.
• Pour all the above over the beef and place in the oven – gas mark 5 – approx 180 , for about 3 hours. Keep checking that the mixture is not drying out, you can add either another tin of chopped tomatoes or more beef stock. I like to leave the meat in the oven until it literally falls apart.
• Once cooked, leave to cool. It is at this point I add the strained tins of kidney beans.
To reheat whilst at the beach or on an amazing trip!
As I said earlier , we love to make this before we go to the beach for the day. However we have also made it before we go on a weekend away. I freeze it, then place the frozen meal in the fridge we have in the van. It will then be defrosted enough for the 2nd night of our trip. It is essential to have some form of refrigeration if you are intending on storing this type of food. In the van we have a fridge which works off the leisure battery but will also go on mains / generator. Another bonus of a fridge is it will keep the beers chilled!!!!- I always said Grumpy had the right idea buying it!
Anyway, I digress!
To reheat, place the sauce along with the beef which you have torn into shreds with a knife and fork, into a pan and slowly reheat. Make sure you don’t burn the bottom! Place a lid or plate on top to keep it warm and remove from the heat. If you are lucky enough to have 2 burners you can keep it warm on as low a heat as you can possibly turn the burner down to. As I have mentioned previously it is harder to regulate the heat on a camp stove than on the home cooker.
Place a cold frying pan on your burner and add a flour tortilla. Add a good dollop of the chilli mixture to the centre of the now warm tortilla. Fold the sides in to form a wrap. Be careful not to add too much juice as you don’t want it all down your clothes!!!! You can also add a dash of sour cream or guacamole!
To eat!!
It is a shame I didn’t manage to get a photo of Ginger Craig at Porth Ceiriad on Sunday. He has perfected the art of eating this chilli wrap! Basically, whilst standing, you grab the wrap with both hands. Stick your bottom out as far as possible. Place hands at chin level with your elbows slightly bent and eat.
Eating using the Craig stance will ensure no nasty stains on your lovely clean Tee shirt – ideally a Grumpy Old Surfer Tee or hoody LOL
Enjoy with a chilled bottle of lager.
To fold the perfect wrap
Whilst the tortilla is in the frying pan place a good dollop of the mixture into the centre / top half of the tortilla.
Fold 1:-Fold the bottom half of the wrap up and over the filling making sure the flap overlaps at least ¼ of the filling .
Fold 2:-Fold one of the long sides over the flap and filling.
Fold 3 :- this extra fold is key to stopping the filling from falling out! . Simply tuck the bottom under the filling- see picture
Fold 4:- Fold the other long side back over the wrap and enjoy!